Orchestrating dbt on Snowflake with Prefect
Ever start with a simple dbt model and then watch it spiral out of control?
Success breeds growth. But as dbt takes on a larger role in your organization, it can become difficult to observe runs and control computing costs. Using Prefect, you can orchestrate your dbt runs in parallel to your other data engineering workflows for additional reliability, observability, and flexibility.
In this post, I’ll show how to use dbt to orchestrate a data transformation job that loads data into a Snowflake table, making your dbt to Snowflake jobs more observable, efficient, and consistent with all data engineering work in your organization.
Benefits of using dbt and Snowflake with Prefect
Why add Prefect to the mix with dbt and Snowflake? Because Prefect gives you a number of features on top of dbt and Snowflake that make your dbt model runs more ready for scale.
Orchestrate, centralize, and run everything from a single location
With multiple teams building and running various workflows, it can become easy to lose track of what’s running, when it last run, and whether that run succeeded or failed. This becomes even more important as your usage of dbt grows and data pipelines become interdependent on one another.
With Prefect, you can bring all of your dbt model runs under the same roof as all of your other Python data engineering work. That provides a consistency of traceability that you might lack if each team has its own approach to calling and managing runs.
Achieve greater reliability
You might think your various data pipeline jobs are running independently, when really there are implicit dependencies on other jobs’ successful states that are not immediately obvious. This can lead to “mysterious” failures. For example, a dbt run could fail if the Fivetran workflow that preceded it didn’t run correctly.
By orchestrating everything via a single platform, you can make these dependencies explicit. For example, you can chain together your Fivetran and dbt workflows so that the latter only runs on the successful completion of the former. Additionally, centralized logging enables you to find and resolve errors that may span the boundary of a single component or workflow.
Prefect improves the reliability of orchestrated workflows. Retries, for example, enable programming custom login to re-run a workflow due to an unexpected error, such as the temporary unavailability of a data store.
Track model run costs
You don’t want to spend good money on large dbt model runs unless you have to. With all of your runs orchestrated via Prefect, you can establish steps in your workflows that need approval before continuing based on model cost. That can include both data warehousing and cloud compute costs. Plus, Prefect enables you to view incidents and track runtime metrics, such as duration, so you can avoid overruns.
Trigger runs through exposed APIs
There’s no need to run a pipeline at all until you need it. For pipelines that don’t need to be run at set intervals, it’s more cost-effective to run them on demand.
Prefect enables kick-starting a dbt run using a variety of triggers. You can create event-driven data pipelines easily, starting a run on-demand via a webhook triggered by an external caller. This can be a post to a Kafka topic, an API call from a serverless function, an Amazon SNS notification, or whatever else you need. If an external system can make an HTTP request, it can trigger a Prefect workflow.
Standardize dbt and Snowflake usage
With all of your pipelines under Prefect, you can standardize how data gets into Snowflake, whether or not it’s from a dbt enabled transformation. For example, you can create a standardized template that all dbt/Snowflake integrations should follow that employs various pre-flight and post-data load checks. These might include:
- Re-running fresh data import jobs before running a dbt job
- Performing data diffs
- Enforcing a consistent approach to materialization across dbt and Snowflake (e.g., tables vs. views)
- Sending alerts to downstream stakeholders to re-run manual tasks that depend on a dbt pipeline’s data
- Triggering downstream Python tasks like ML model re-training
Walkthrough: Using dbt and Snowflake with Prefect
Let me make this more concrete with an example. Suppose you have a dbt pipeline that imports and transforms data representing orders. You want to load this data into a table in Snowflake after applying some basic transformations.
In the rest of this post, I’ll step through how to do this in Prefect using dbt’s Jaffle Shop example pipeline. Jaffle Shop defines three data sets: customers, orders, and payments. It uses dbt’s seed functionality to load the raw data from CSV files into three Snowflake tables: raw_customers, raw_orders, and raw_payments. The dbt models then transform and merge the data into two tables: customers and orders.
For this walkthrough, you’ll need:
- A Snowflake account with administrator access
This post will use dbt Core to run dbt jobs. If you use dbt Cloud, see the bottom of this post for information on how Prefect enables running dbt Cloud jobs easily.
You’ll perform the following steps to get this up and running:
- Create a Prefect account and set up Prefect locally
- Configure Snowflake
- Set up dbt Core + Snowflake locally
- Create a Prefect deployment for your dbt workflow
- Trigger the deployment and monitor the run in Prefect
Create a Prefect account and set up Prefect locally
First, create a Prefect account (if you don’t have one). Then, install Prefect and its associated command-line tools locally using pip: pip install -U prefect. Login to Prefect with the following command: prefect cloud login.
Finally, create a virtual environment in Python to isolate any workflow-specific dependencies:
1python3 -m venv "env"
2source env/bin/activate
3# For Windows users, active your virtual environment with:
4.\venv\Scripts\activate
Configure Snowflake
dbt’s Jaffle Shop example will create the raw tables you need for you from CSV files. All you need to do in Snowflake is create:
- A database to store the schema and data; and
- A warehouse to process SQL requests.
Log in to Snowflake and, in a blank worksheet without a database selected, create your database as follows: CREATE DATABASE "raw";. Then, create your warehouse with the following command: CREATE WAREHOUSE transforming;.
Set up dbt Core + Snowflake locally
You’ll need to set up dbt to use Snowflake, let’s do this first.
- Create a virtual environment in Python in which to work: python3 -m venv dbt-env then source dbt-env/bin/activate.
- Install dbt Core along with the dbt adapter for Snowflake into your virtualenv. You can do this with a single command: python -m pip install dbt-snowflake.
- Fork the Jaffle Shop sample into your own GitHub account and then clone it to your machine using git clone: git clone https://github.com/<your-github-username>/jaffle_shop.git
Now that you have all the code you need, cd into the jaffle_shop directory and configure a profiles.yml file that tells dbt how to connect to your Snowflake data warehouse. For this sample, you can use the following as a template. If you use username/password authentication, set your username and password from the command line as the environment variables DBT_USER and DBT_PASSWORD. You can also opt to use another authentication mechanism with Snowflake, such as a private key.
1jaffle_shop:
2  target: dev
3  outputs:
4    dev:
5      type: snowflake
6      account: <account-name>
7
8      # User/password auth
9      user: "{{ env_var('DBT_USER') }}"
10      password: "{{ env_var('DBT_PASSWORD') }}"
11
12      role: ACCOUNTADMIN
13      database: raw
14      warehouse: transforming
15      schema: jaffle_shop
16      threads: 1
17      client_session_keep_alive: False
18
19      # optional
20      connect_retries: 0 # default 0
21      connect_timeout: 10 # default: 10
22      retry_on_database_errors: False # default: false
23      retry_all: False  # default: false
24      reuse_connections: False # default: false (available v1.4+)
Finally, create an empty packages.yml file. Packages are reusable code modules in dbt shared across projects and teams. You won’t use any packages for this walkthrough but including an empty file will suppress unnecessary runtime errors.
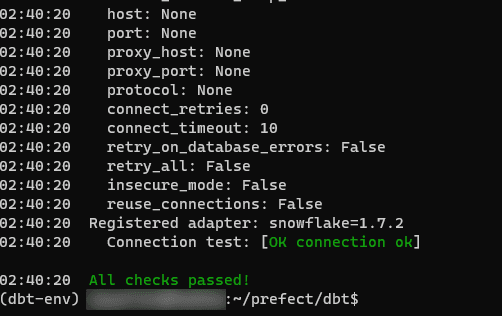
Once you’ve finished configuring everything, test it out with: dbt debug. This will ensure that your dbt project is configured correctly and that you can connect to your Snowflake cluster. The last part of the readout should look like this:
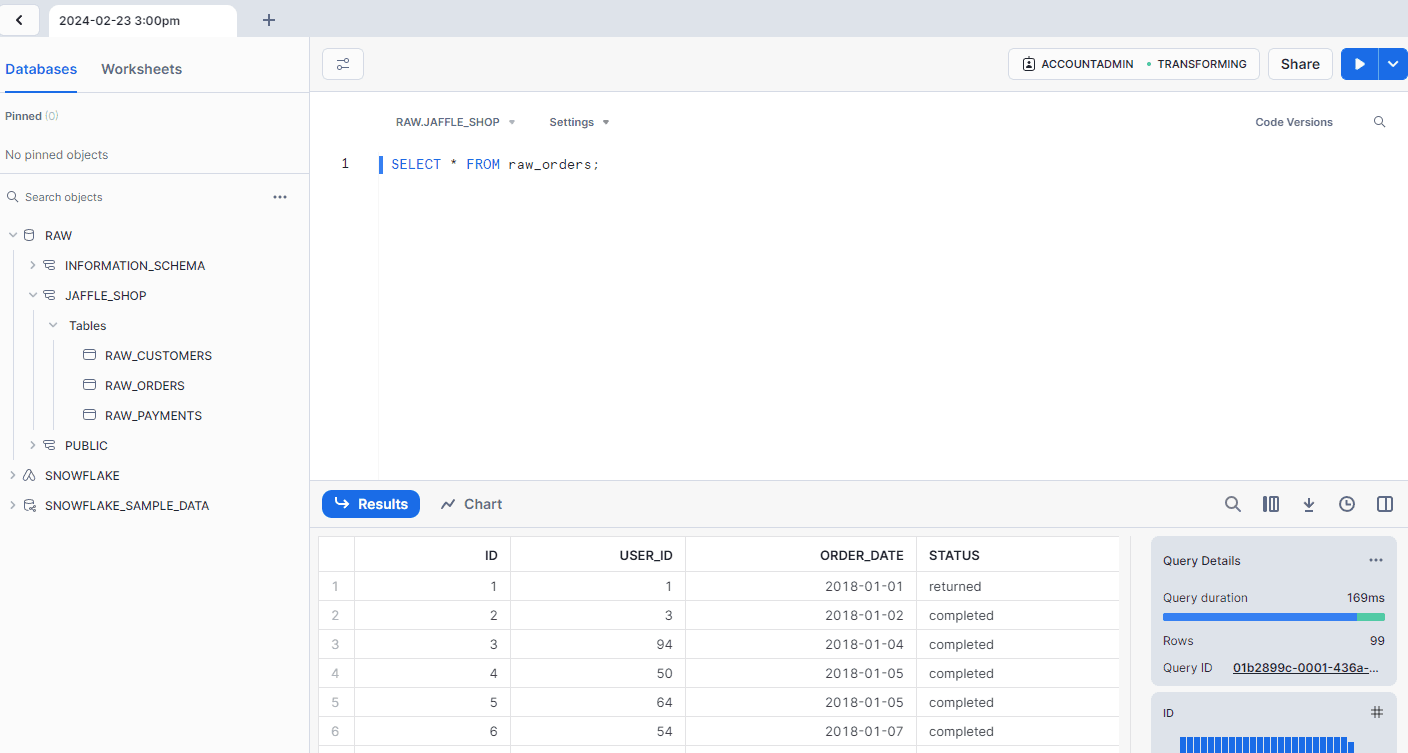
Once that’s passed, run dbt seed to load the initial raw data into Snowflake. If seed runs successfully, you should be able to query the raw_orders data from Snowflake and see the initial input to your pipeline: SELECT * FROM raw_orders;
Create a Prefect deployment for your dbt workflow
Now you’re ready to run your model as a Prefect workflow. There are several ways to do this but the fastest is to leverage the prefect-dbt-flow project from Dataroots.
In Prefect, a workflow, or flow, is the basic unit of workflow execution. A given flow can be subdivided into one or more tasks. Breaking flows down into tasks makes it easier to visualize how the separate components of your workflow relate to one another. It also makes it easier to pinpoint failures when they occur, as you can isolate the failure to a single task and debug the relevant line(s) of code.
prefect-dbt-flow will automatically turn every node in dbt - a model, seed, test, or snapshot - into a task as part of your Prefect workflow. To see how it works, install prefect-dbt-flow into your virtualenv using pip: pip install prefect-dbt-flow
Next, save the following code as a file named dbt-jaffle.py as a file in the parent directory of the jaffle_shop directory:
1from prefect_dbt_flow import dbt_flow
2from prefect_dbt_flow.dbt import DbtProfile, DbtProject
3
4my_flow = dbt_flow(
5    project=DbtProject(
6        name="jaffle_shop",
7        project_dir="jaffle_shop/",
8        profiles_dir="jaffle_shop/",
9    ),
10    profile=DbtProfile(
11        target="dev"
12    )
13)
14
15if __name__ == "__main__":
16    my_flow()
This code differs a little bit from a standard Prefect flow, which uses decorators to turn Python functions into flows or tasks. It creates a dbt_flow object that points to your dbt project and specifies the environment profile you wish to use for this run. The __main__ method invokes and runs this flow in Prefect.
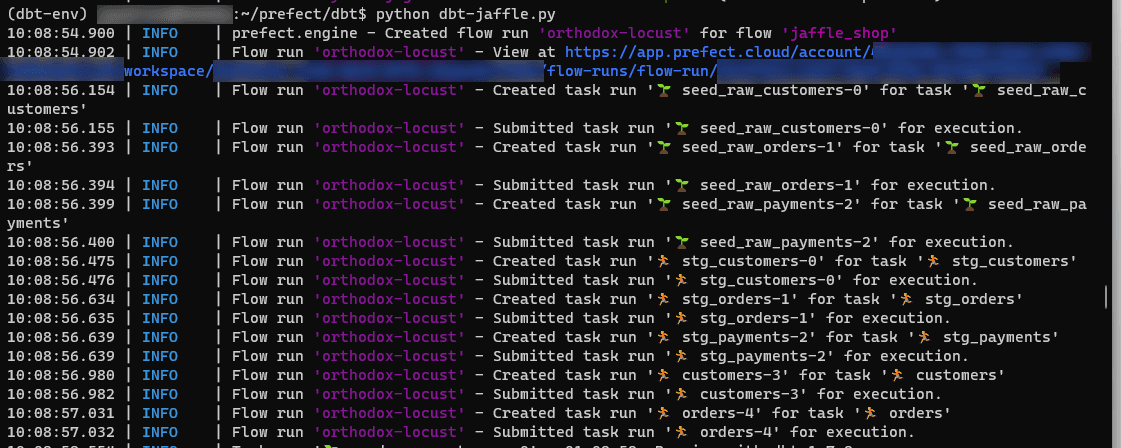
To see this in action, run it on the command line with: python dbt-jaffle.py
You’ll see that dbt-prefect-flow separated your dbt project into tasks. As Prefect runs, you will get a notification that the task is running, and will be able to see any debug output, as well as task success or failure status:
Prefect will also generate a URL you can use to display this flow run in the Prefect UI. Here, you can see an easier-to-read version of the command line output, along with a graph showing you visually all of your tasks and how they interact with one another.
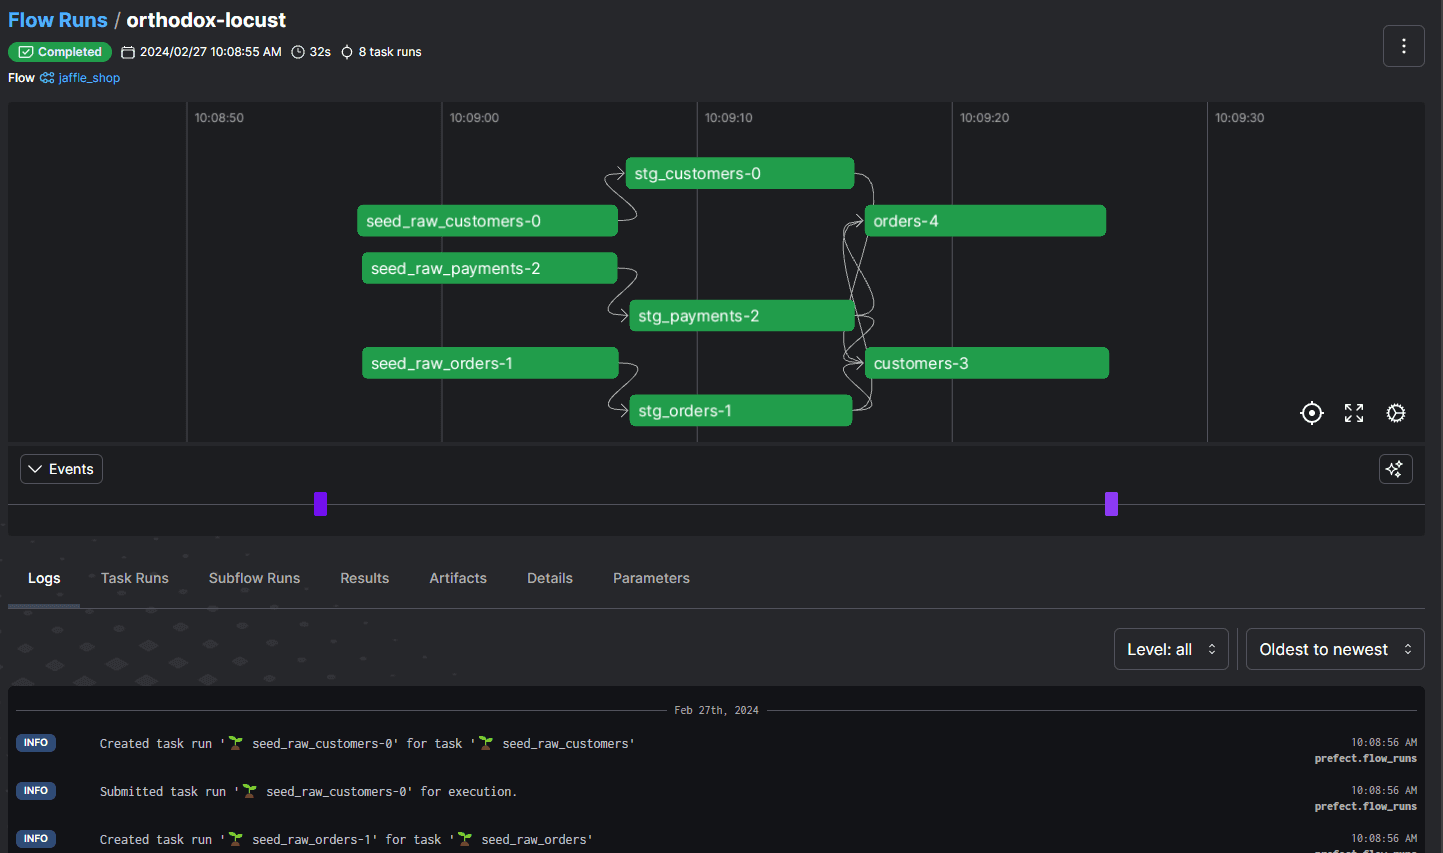
Using Prefect with dbt, you can assemble data transformation pipelines to any degree of complexity and track them easily in the Prefect UI. For example, you could launch subsequent workflows that depend on this data pipeline, or subflows that your flow relies on for more detailed processing, and track them all via the UI.
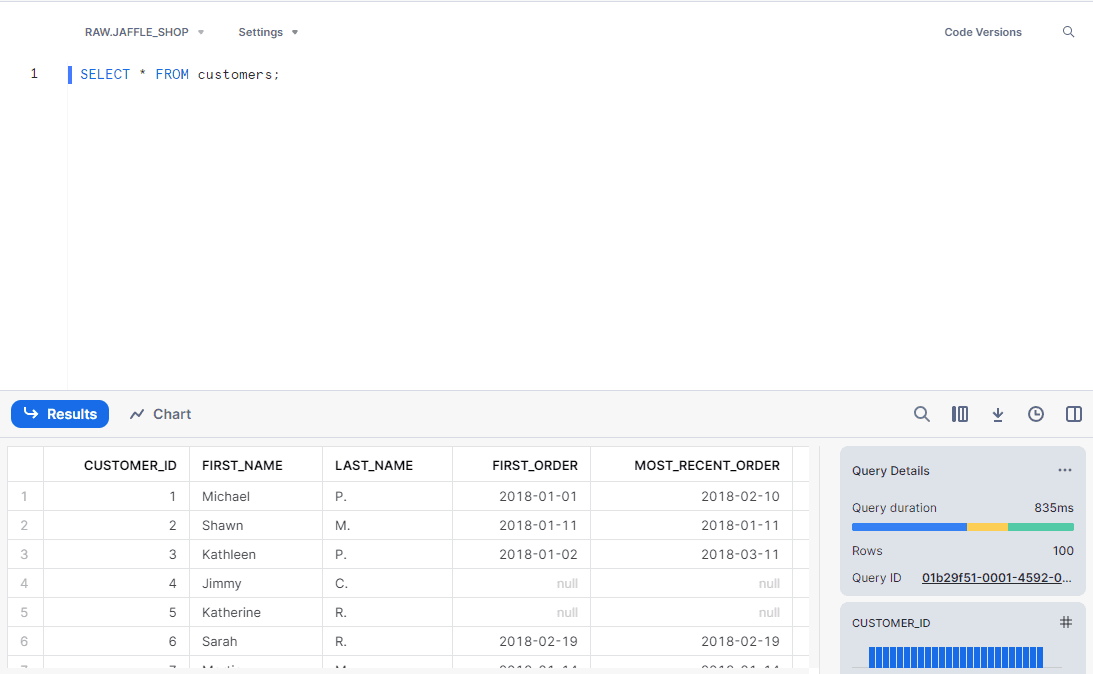
After your workflow completes, you can see the results in Snowflake by querying one of the tables created by your dbt workflow: SELECT * from customers;
Other ways to run dbt and Snowflake from your workflows
I used dbt Core in our walkthrough here. You can also use dbt Cloud, kicking off dbt runs in your dbt Cloud account using a REST call and an API key. Prefect supports connecting easily to dbt Cloud using our dbt Cloud connector and the run_dbt_cloud_job() function.
You can also connect directly to a Snowflake instance - e.g., to import data through another method or if you want to verify whether fresh data has arrived since the previous run. Prefect’s Snowflake connector enables you to store Snowflake connection credentials securely and run arbitrary queries against your data warehouse.
Final thoughts
I’ve shown today how you can use Prefect to manage dbt/Snowflake integrations of any scale and complexity. To try it out yourself, sign up for a free Prefect account and create your first workflow.
Related Content


