
Automatically Respond to GitHub Issues with Prefect and Marvin
In only 50 lines of code
If you contribute to software and are responsible for staying on top of GitHub issues, you know that they can quickly become overwhelming. Issues don’t always arrive as sparkling examples of clear prose. GitHub issue templates help, but you still sometimes end up feeling like you’re reading a detective novel, hunting for the clues to take you to the essence of the case. 🔎
Wouldn’t it be nice if an LLM trained on your docs could respond with a helpful suggestions for the user?
In this post you’ll see how to create an event-driven workflow with Prefect, Marvin, and AWS ECS to quickly get the information you need and help users with problems in near real time.
Let’s get to it!
Setup
Install
Create a Python virtual environment and install Prefect and Marvin with pip install -U prefect marvin.
Marvin is a lightweight AI engineering framework for building natural language interfaces that are reliable, scalable, and easy to trust.
Prefect is a workflow orchestration tool empowering developers to build, observe, and react to data pipelines.
Sign up for a free forever Prefect Cloud account or use and existing Prefect Cloud account. This example requires Webhooks and Automations - awesome features that are only available on Prefect Cloud. ☁️
Authenticate your CLI to Prefect Cloud with prefect cloud login. Click the button in the browser to authenticate.
Create a JSON webhook
We originally created this project as part of an internal relay hackathon at Prefect to show how Prefect and Marvin can be used together to solve problems.
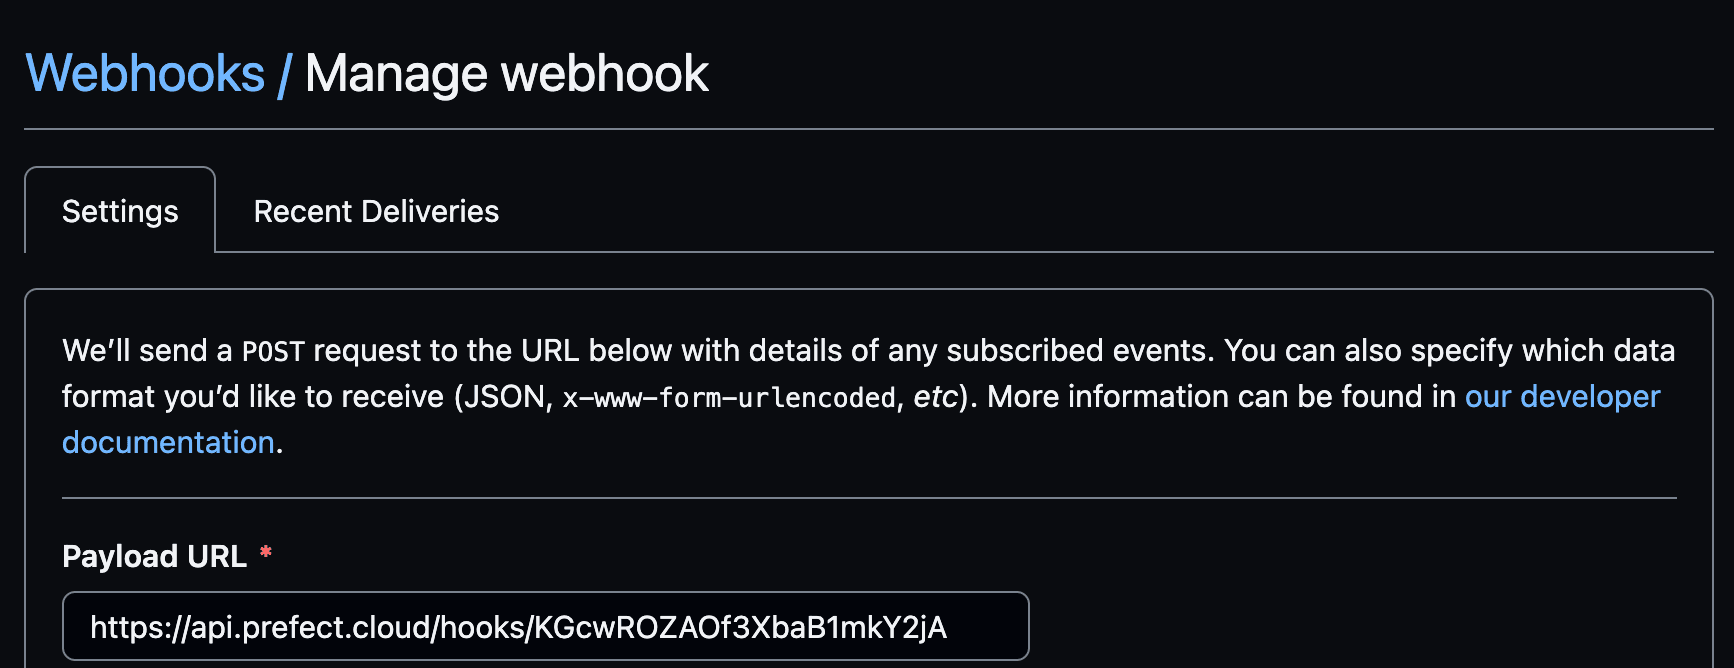
Let’s create a JSON webhook in our https://github.com/PrefectHQ/Project-2-TPV-GTM-Relay GitHub repository that uses a Prefect webhook address. When an issue is opened the webhook will send a payload to Prefect with the issue number, title, body, and user name.
In the Prefect UI, create a webhook using a Dynamic template as a base.

Let’s set the event’s name to the issue title and include other relevant information we might use in our code in the resource field.
1{
2    "event": "{{body.issue.title}}",
3    "resource": {
4        "prefect.resource.id": "gh-repo.{{ body.issue.number }}",
5        "GH repo": "discdiver/GitHub-Issue-Autoresponder",
6        "number": "{{ body.issue.number }}",
7        "title": "{{ body.issue.title }}",
8        "body": "{{ body.issue.body }}",
9        "user": "{{ body.issue.user.login }}"
10    }
11}
Copy the webhook address from Prefect Cloud.
In the GitHub repo navigate to Settings→Webhooks-Add webhook and paste the webhook address into the Payload URL field. The screenshot below shows our webhook URL, but you’ll want to use your unique webhook URL.
Check the boxes:Let me select individual events and Enable SSL verification. Choose the Issues individual event.
Create the webhook and click on the Recent Deliveries tab. Momentarily, you should see a successful test ping. Create an issue and you should see another successful delivery.

Boom, we’re in business!
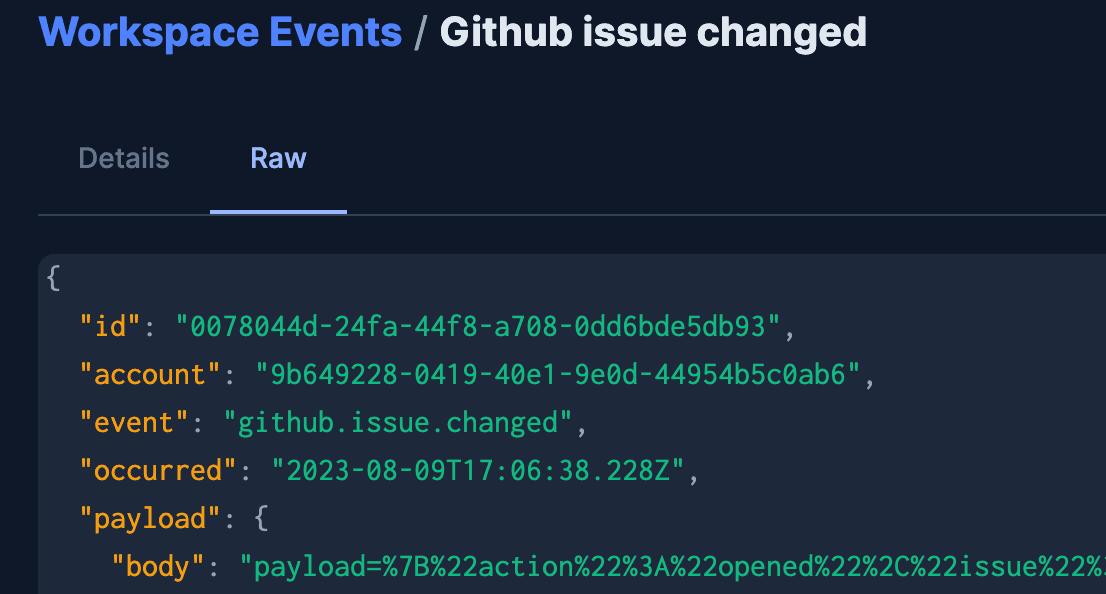
On the Prefect Cloud side, check out the Event Feed tab and you should see events from GitHub!

Click on an individual event’s title and then the Raw tab to get all the details, including the raw payload.
Now let’s write some Python code to do something with this event data.
Python code
The code for this project can be found in the same GitHub repo where we created our webhook: https://github.com/PrefectHQ/GitHub-Issue-Autoresponder.
The completed script incorporates our AI function into a flow that summarizes the GitHub issue and generates a response via Marvin. The response is then posted to the GitHub issue.
1import os
2
3import marvin
4import json
5import requests
6from marvin import ai_fn
7from prefect import flow, task, get_run_logger
8
9
10@ai_fn
11def summarize_github_issue(issue_text: str) -> str:
12    """ Given the github issue text, summarize it """
13
14
15@ai_fn
16def marvin_response(issue_text: str) -> str:
17    """
18    Given the GitHub issue text, provide a friendly suggestion for a work around in Prefect 2.0.
19    If a work around does not exist, return a message saying that the team at Prefect is looking into it.
20    """
21
22
23@task
24def issue_comment(owner: str, repo: str, issue_number: str, message: dict):
25    """Send the issue comment to GitHub"""
26    github_api_key = os.environ["GITHUB_API_KEY"]
27    token = f"Bearer {github_api_key}"
28    header = {
29        "Authorization": token
30    }
31    requests.post(f"https://api.github.com/repos/{owner}/{repo}/issues/{issue_number}/comments",json=message, headers=header)
32
33
34@flow
35def suggested_fix_from_marvin(issue_number: int, issue_text: str, user_login_name: str) -> None:
36    open_api_key = os.environ["OPENAI_API_KEY"]
37    marvin.settings.openai.api_key = open_api_key
38
39    summary = summarize_github_issue(issue_text)
40    response = marvin_response(summary)
41
42		logger = get_run_logger()
43		logger.info(response)
44
45    if response:
46        message = {"body": response}
47        issue_comment("PrefectHQ", "Project-2-TPV-GTM-Relay", issue_number, message)
48
49    return None
Let’s break this down.

Let’s first look at our flow-decorated function named suggested_fix_from_marvin that acts as our assembly function. This function takes an issue number, issue text, and user login (name) as parameters. These argument values will be fed in from a Prefect automation that will use the Prefect event that will use the Prefect webhook URL that will receive a JSON payload from GitHub when an issue is created. Phew!
Marvin will use an OpenAI GPT4 API key to create responses. Create an account at OpenAI or log in and generate a key.
Set the API key as an environment variable. Above we used the name OPENAI_API_KEY and pass this value into Marvin’s settings.
We then call the summarize_github_issue function. Notice the ai_fn decorator. This decorator comes from the Marvin library and the function has type hints that specify the issue_text should be a string and the return value should be a string. The function has a doc string with instructions for handling the string it receives that read Given the github issue text, summarize it. That’s it. There’s no imperative code. If this blows your mind, check out other Marvin examples in the docs. 🤯
The issue summary is saved in the summary variable, which is passed to the marvin_response function. This function AI function has these instructions:
1Given the GitHub issue text, provide a friendly suggestion for a work around in Prefect 2.0.
2If a work around does not exist, return a message saying that the team at Prefect is looking into it.
The response generated by Marvin is returned to the calling flow function and saved in the response variable. The response is then logged to Prefect Cloud and saved as the value for the body key in the message dictionary.
The issue_comment task function is then called with the relevant information, including the Marvin-generated response to the issue. The GitHub API key generated by the user and saved in an environment variable is passed as the authorization token when the POST request is sent to GitHub. Instead of environment variables, you could use Prefect Secret blocks to store the API key values. This alternative obfuscates the values of these API keys. You can learn more about blocks here.
That’s the code. Note that teams built this project in stages, testing that each part worked as they progressed, so don’t feel like your code needs to arrive fully formed.
Create a work pool in Prefect Cloud
If we wanted to quickly create a deployment and run a local server to respond as an example, we could use the new flow.serve() functionality introduced in Prefect 2.12. Then we wouldn’t need to create a work pool and configure ECS or create a deployment with a prefect.yaml file or prefect deploy. We would just use flow.serve() and be off to the races. 🐎
For this example, we’ll use and AWS ECS push work pool that runs on demand. This solution is more industrial strength. Alternatively, you could use Google Cloud run or Azure as push work pool. Note that push work pools are convenient because they don’t require you to run a worker to poll for scheduled flow runs. When you’re finished you could just close your laptop and run everything a serverless manner.
Create a work pool in the UI by clicking on the Work Pools tab and selecting the + button.
Choose AWS Elastic Container Service - Push and proceed to the next screen.
Click the Add + button under AWS Credentials to create an AWS Credentials block.
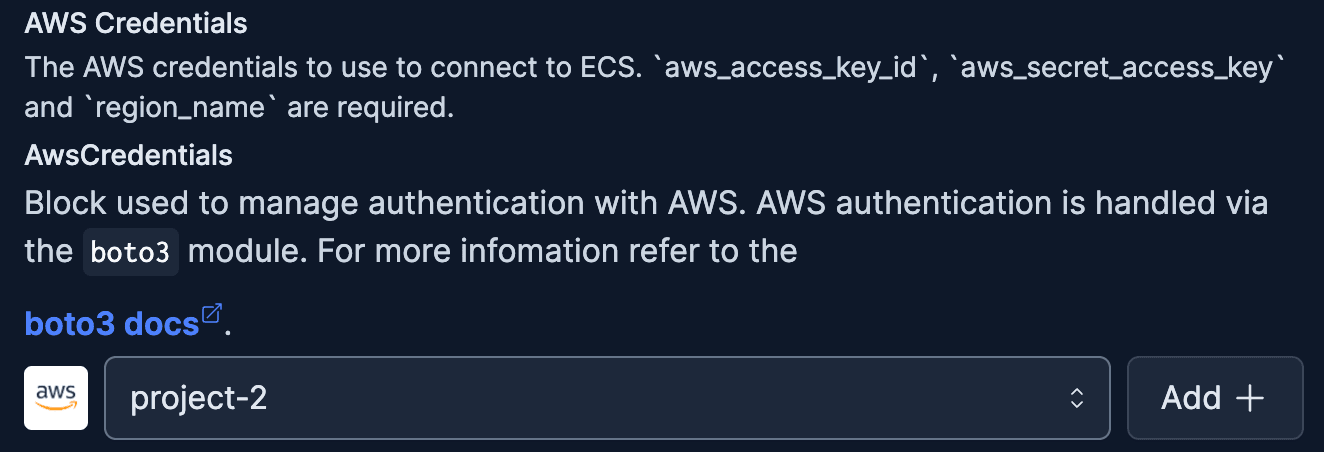
In AWS, configure an AWS ECS user and attach the AmazonECS_FullAccess permissions. Create an access key for the user.
In Prefect Cloud, name your block and paste your credentials into the AWS Access Key ID and AWS Access Key Secret into the relevant fields. Complete the block creation and then select your new AWS Credentials block in your ECS push work pool.
We could bake our additional Python packages into our Docker image, but Prefect gives us a quick way to add packages through the Environment Variables field with the "EXTRA_PIP_PACKAGES" key.
Let’s specify the environment variables we need in our script and the packages we need beyond Prefect, which is included in the Prefect-maintained Docker image. Environment variables:
{"GITHUB_API_KEY":"abc123","OPENAI_API_KEY":"abc123","EXTRA_PIP_PACKAGES":"marvin prefect_aws"}
Let’s set the Task Start Timeout Seconds to 300 to give everything time to start up. Click through to create the work pool and let’s move on.
Create a deployment
Let’s create a deployment so our flows can run automatically on AWS ECS.
You can run prefect deploy to create a deployment through the interactive guided experience. We’ll store our flow code in our GitHub repository. It will be cloned into our ECS container at deployment run time.
1# Welcome to your prefect.yaml file! You can you this file for storing and managing
2# configuration for deploying your flows. We recommend committing this file to source
3# control along with your flow code.
4
5# Generic metadata about this project
6name: Project-2-TPV-GTM-Relay
7prefect-version: 2.11.3
8
9# build section allows you to manage and build docker images
10build:
11
12# push section allows you to manage if and how this project is uploaded to remote locations
13push:
14
15# pull section allows you to provide instructions for cloning this project in remote locations
16pull:
17- prefect.deployments.steps.git_clone:
18    repository: https://github.com/PrefectHQ/Project-2-TPV-GTM-Relay.git
19    branch: main
20    access_token:
21
22# the deployments section allows you to provide configuration for deploying flows
23deployments:
24- name: project2_github_response
25  version:
26  tags: []
27  description:
28  entrypoint: ./flow.py:suggested_fix_from_marvin
29  parameters: {}
30  work_pool:
31    name: project2
32    work_queue_name:
33    job_variables: {}
34  schedule:
We’ll save our prefect.yaml deployment configuration file in our our GitHub repository. Head over to the Prefect Cloud UI to see our newly created deployment.

Create an automation in Prefect Cloud
Let’s create an automation in the Prefect UI to run the deployment when the event (an issue was created) is received at the webhook URL. Automations create an action in response to a trigger.
The trigger event can be seen in the Event Feed tab in Prefect Cloud.
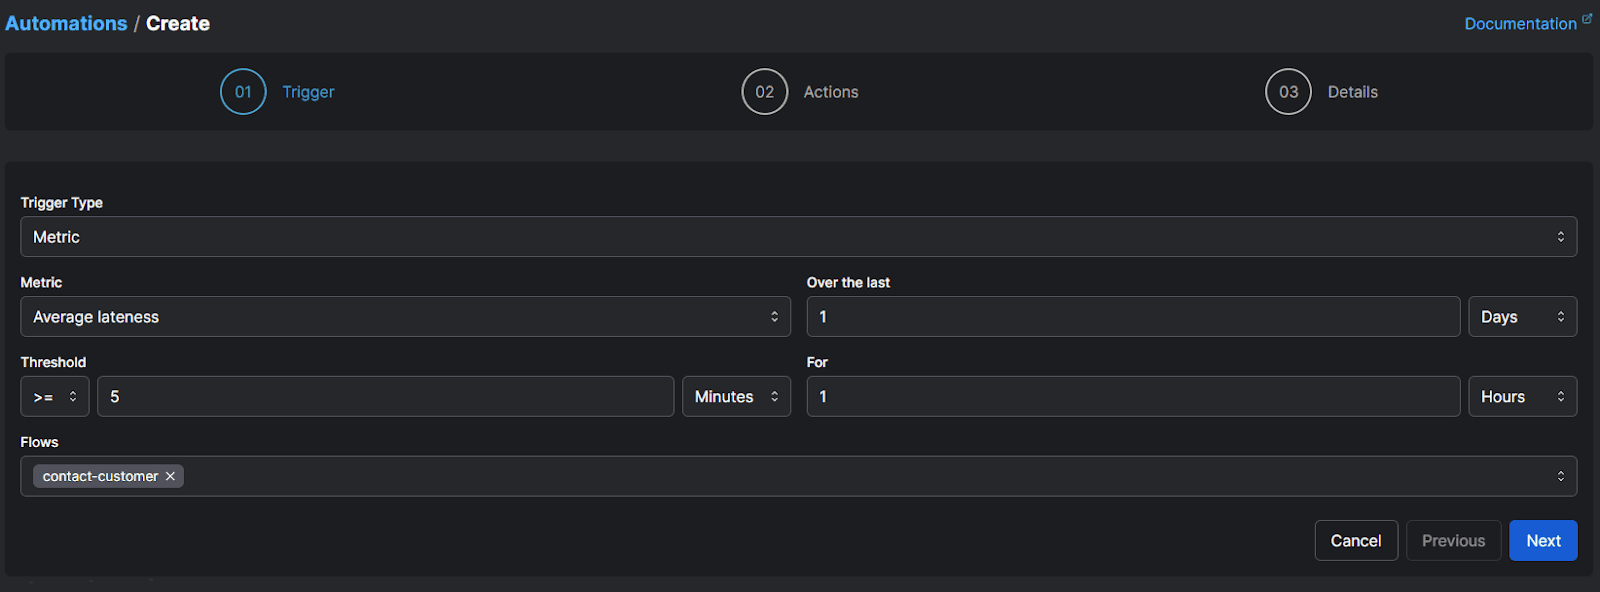
There are several ways to create an automation. The quickest is probably to click on the event in the event feed and select Automate from the three dot menu in the top right of the page. We’ll then be in the Automations/Create page with our trigger field pre-populated.
Our custom trigger type will match on any Prefect events with a resource id that start with github.issue. Here’s the specification:
1{
2  "match": {
3    "prefect.resource.id": "github.issue.*"
4  },
5  "match_related": {},
6  "after": [],
7  "expect": [],
8  "for_each": [
9    "github.issue"
10  ],
11  "posture": "Reactive",
12  "threshold": 1,
13  "within": 0
14}
Next, let’s head to step 2 in our Automation, Actions. We’ll set our automation to run our deployment with the parameter values from the event. In other words, the issue number, issue text, and user login (name) parameter values for the entrypoint flow are passed from the event through the automation.
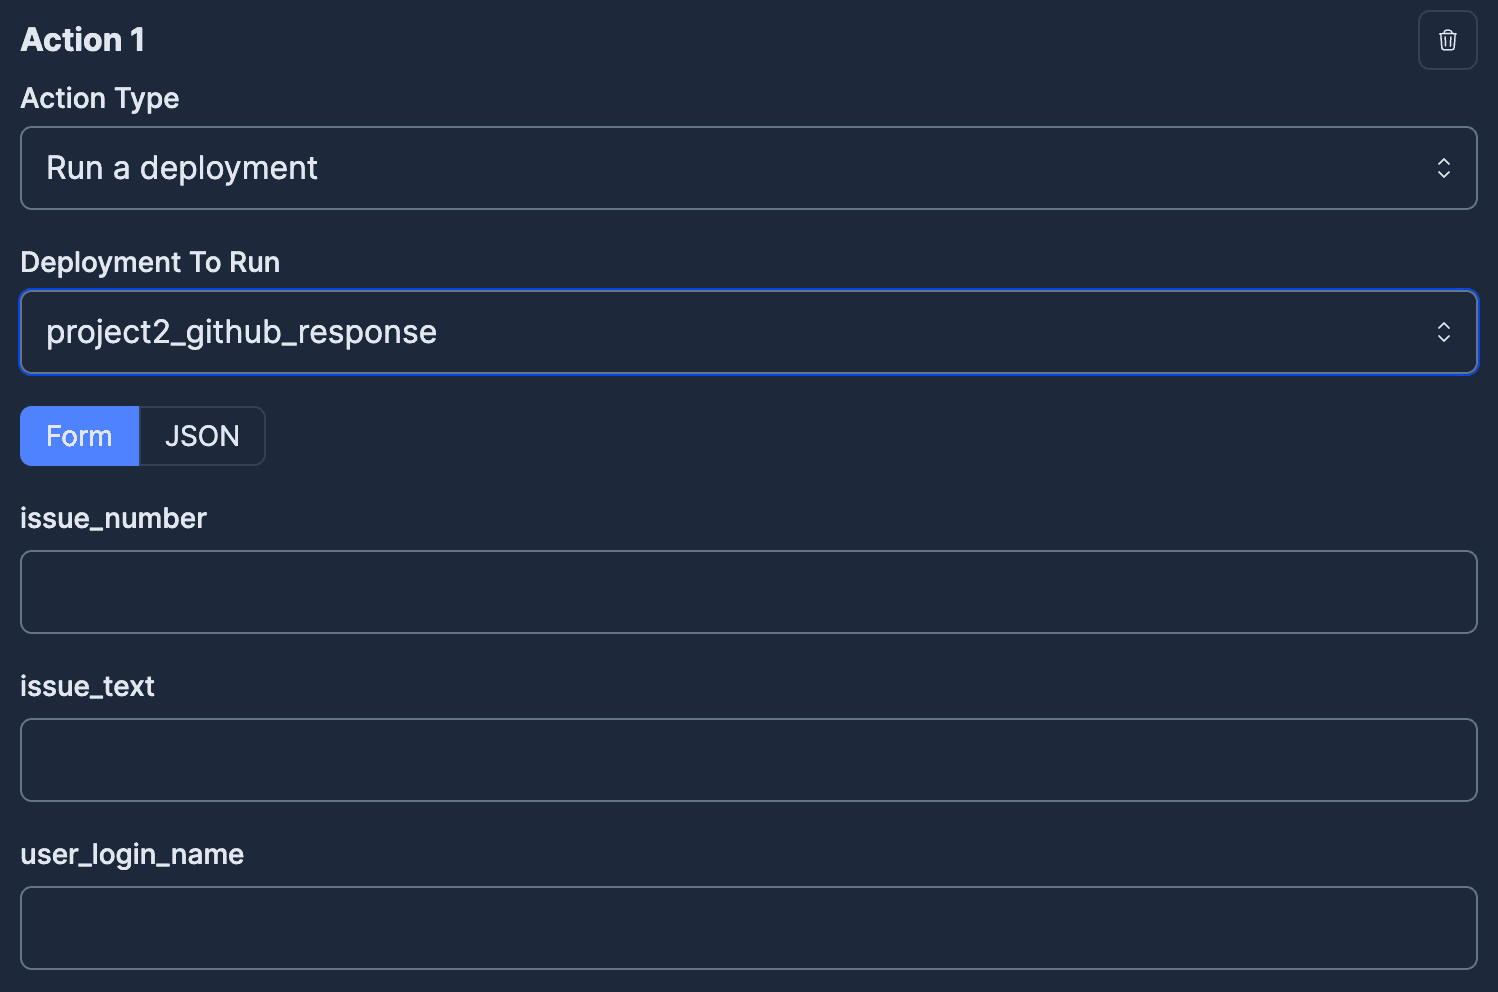
In particular, we need to specify the dynamic values from our webhook event in JSON using Jinja2 templating syntax. Here's what we want to input on the JSON tab:
1{
2  "issue_text": "{{ event.resource.body }}",
3  "issue_number": "{{ event.resource.number }}",
4  "user_login_name": "{{ event.resource.user }}"
5}
Test it
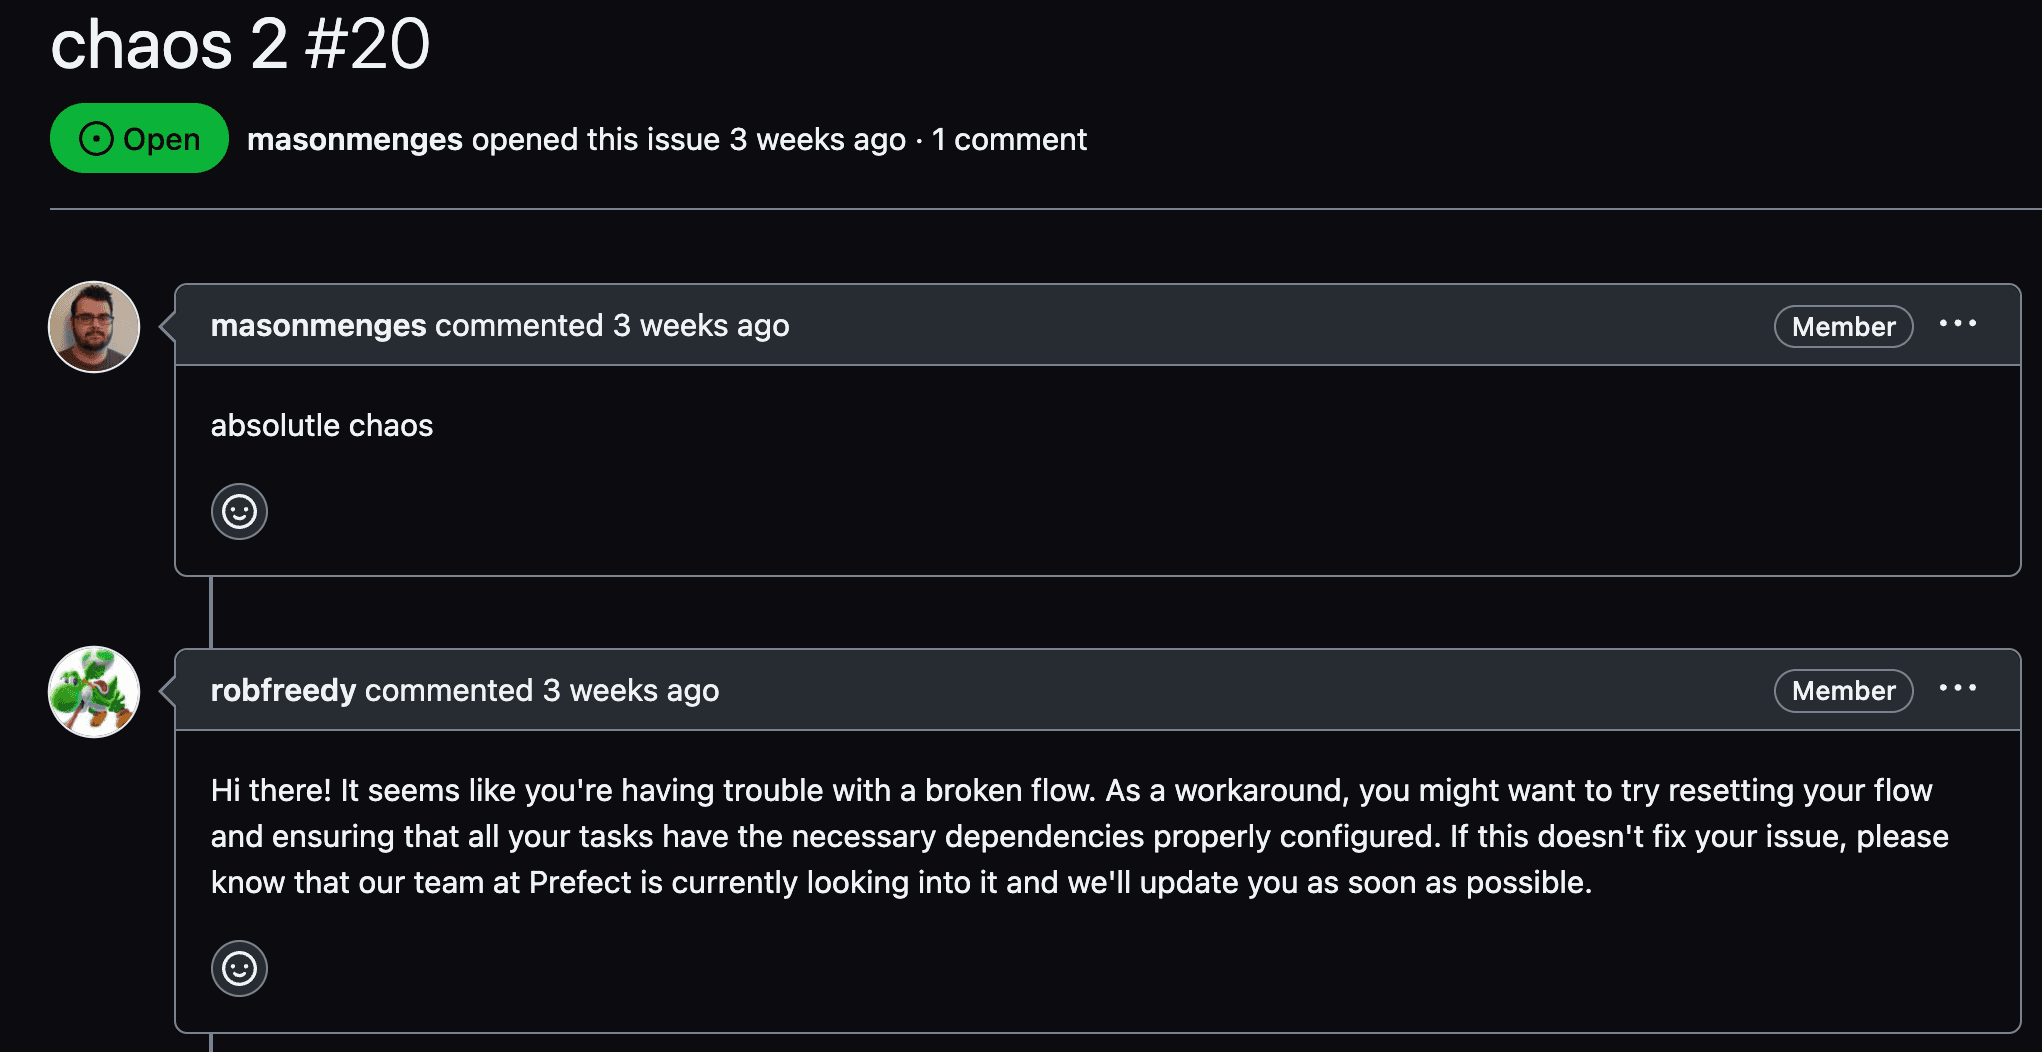
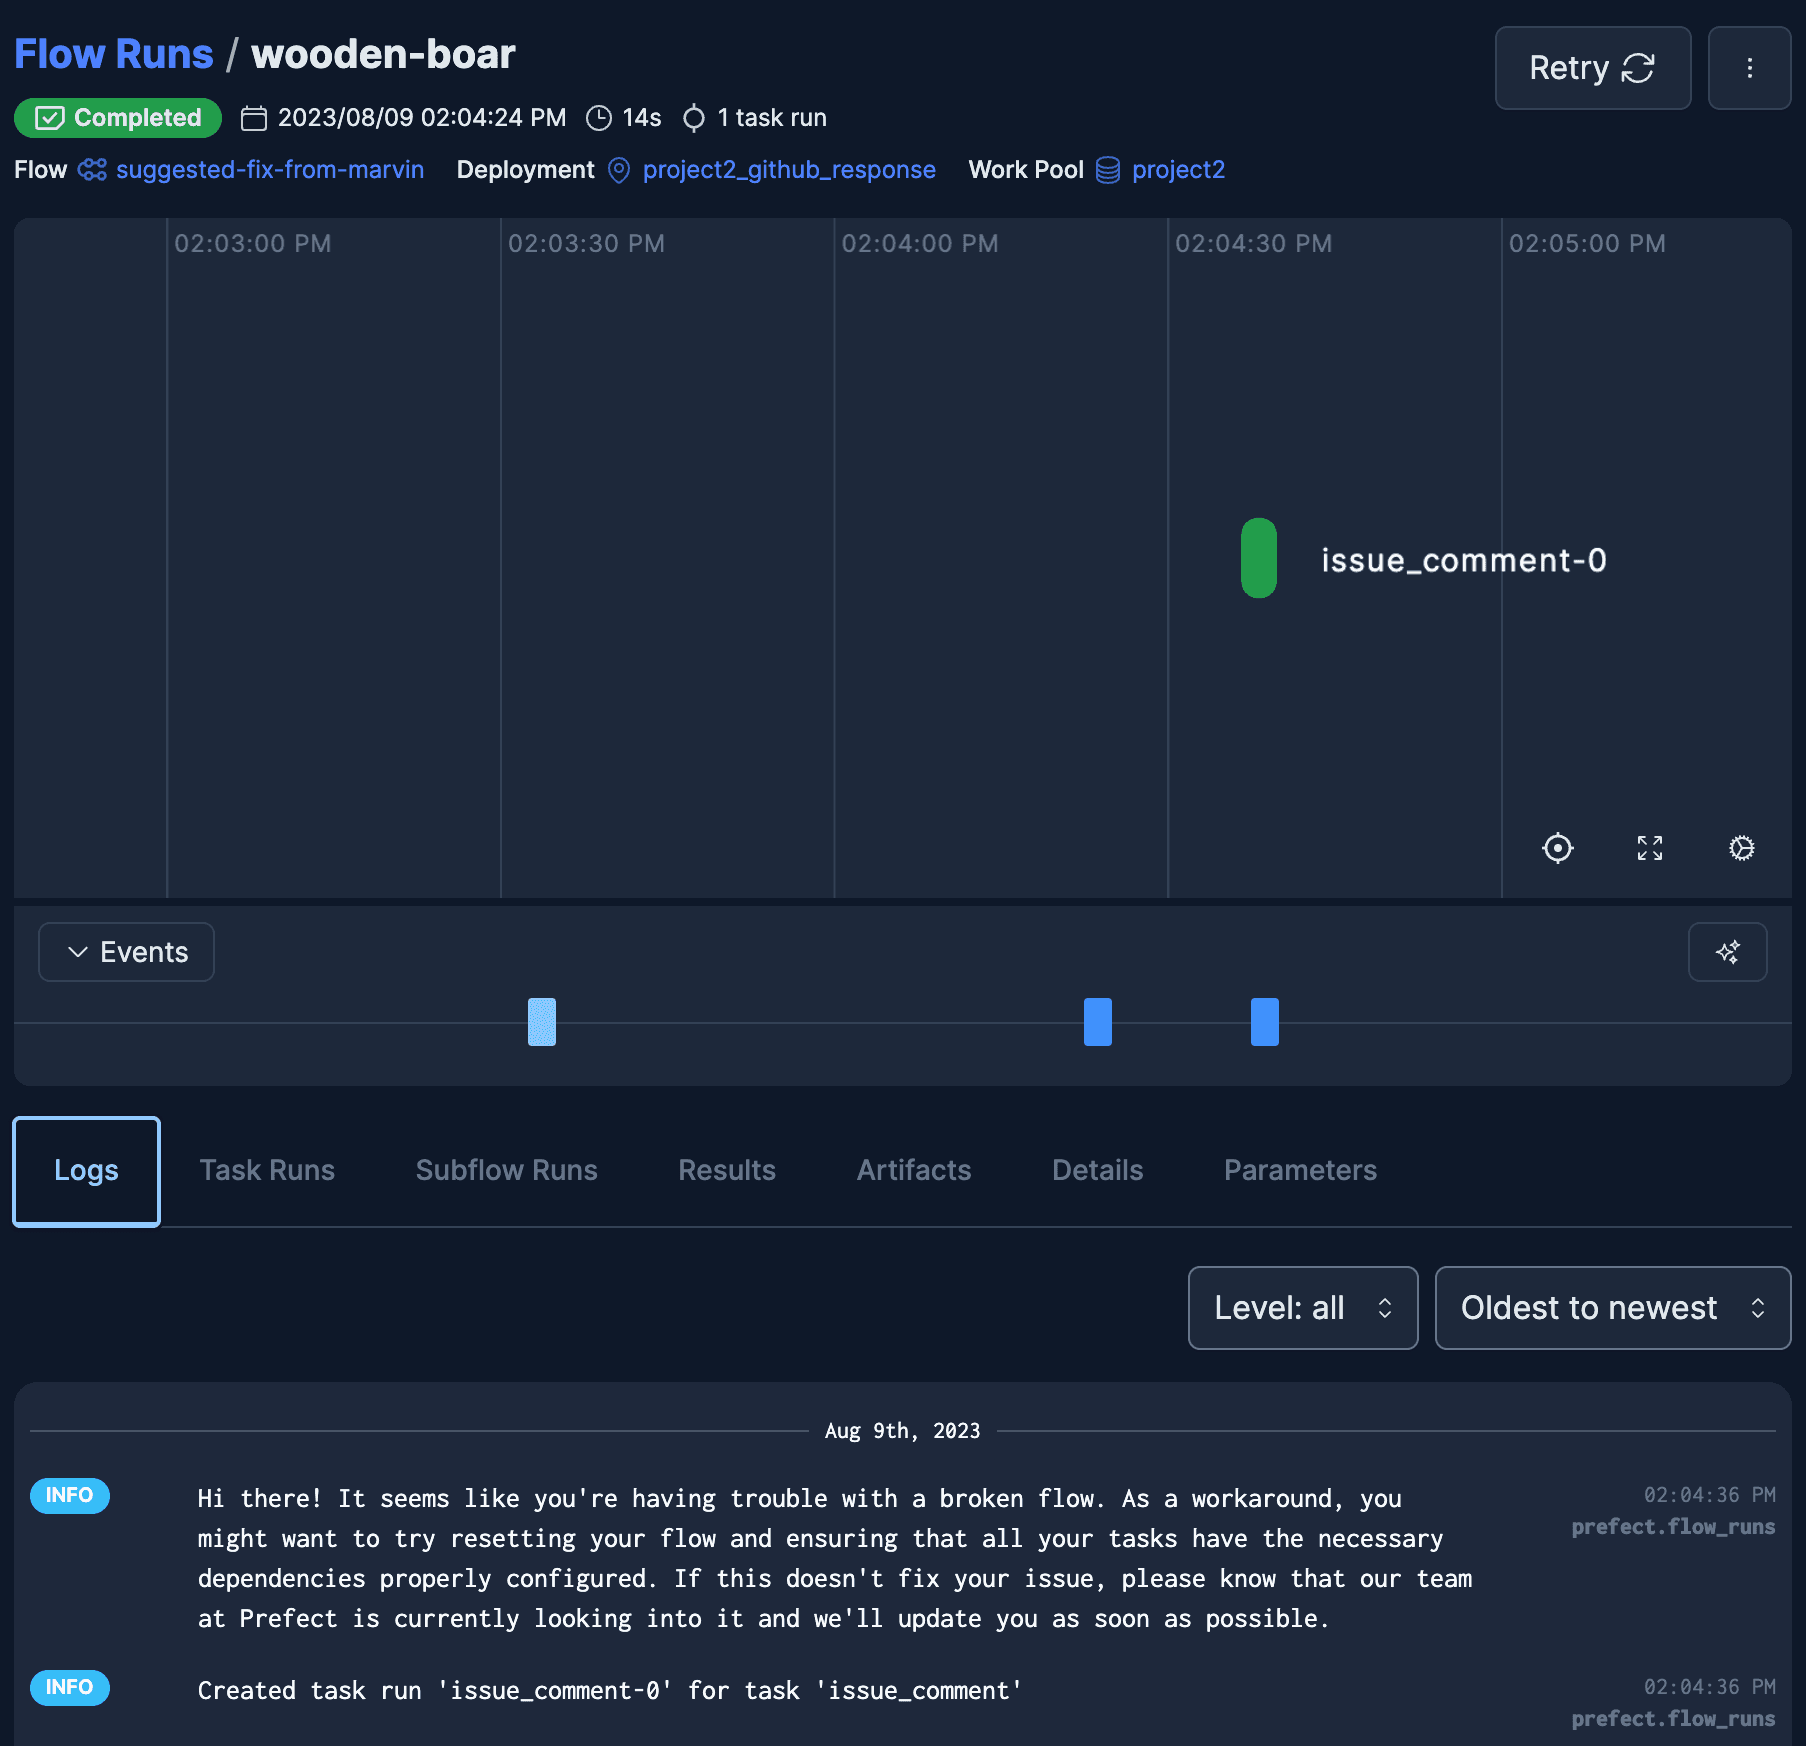
File an issue in the GitHub repository and you should soon see a response from Marvin!
See the screenshot below where Mason passed in a less-then helpful issue and Marvin, through Rob’s API key, responded with some information that makes the best of it. 🙂
You can check out all the details of the whole webhook → flow run sequence in the Prefect Cloud UI.
Optional: Improve Marvin’s response quality
Want to improve the quality of Marvin’s responses? We can use the Chroma vector store with a local SQLite DB to generate a potential response solution. We could use this repo to set up Chroma with Prefect’s docs pre-loaded.
Wrap
In this post you’ve seen how to leverage the power of Prefect and Marvin to create event-driven workflows in response to new GitHub issues. You saw how to You can apply a similar setup to other GitHub events, such as summarizing new pull requests.
We can’t wait to see what you build with Prefect and Marvin. Happy engineering!
Prefect makes complex workflows simpler, not harder. Try Prefect Cloud for free for yourself, download our open source package, join our Slack community, or talk to one of our engineers to learn more.
Bonus
Hackathon teams in action working on projects such as this one:


Related Content